You can integrate your SAML2 Single Sign-On (SSO) with the Fonolo Portal using Okta. This guide will walk you through setting up the Fonolo SSO.
Add Fonolo as an App
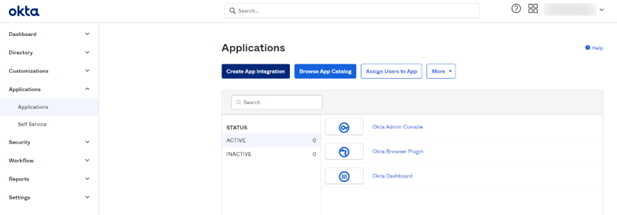
- Log in to Okta as an administrator.
- On the Okta sidebar dashboard, go to Applications > Applications.
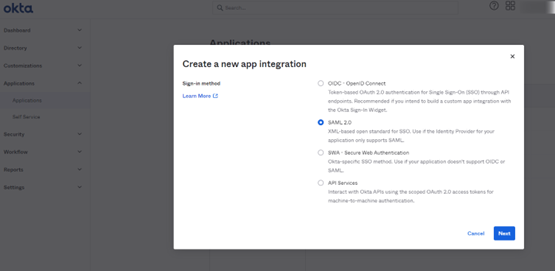
- Select Create App Integration. The Create a New App Integration dialog opens.
- Select SAML2.0 as the Sign on method.
- Select Next. The Edit SAML Integration page opens.
General Settings
- Enter an appropriate name in the App name field.
- (Optional) Add an icon as the App logo. You can save the following image to use as the icon:

- (Optional) Add an icon as the App logo. You can save the following image to use as the icon:
- Select Next to continue. The Configure SAML tab opens.
Configure SAML
- Enter the SAML settings exactly as follows. Fields that are not shown can be left as default:
Field Name Value Single sign on URL https://portal.fonolo.com/saml Use this for Recipient URL and Destination URL ✓ (checked) Audience URI (SIP Entity ID) https://portal.fonolo.com/saml/metadata Default RelayState (leave blank) Name ID format EmailAddress Application username Email Update application username on Create and update - Select Advanced Settings to continue the configuration.
- Enter the Advanced Settings exactly as follows. Fields that are not shown can be left as default:
Field Value Response Signed Assertion Signature Signed Signature Algorithm RSA-SHA256 Digest Algorithm SHA256 Assertion Encryption Unencrypted Authentication Context Class X.509 Certificate Honor Force Authentication Yes SAML Issuer ID http://www.okta.com/$(org.externalKey) 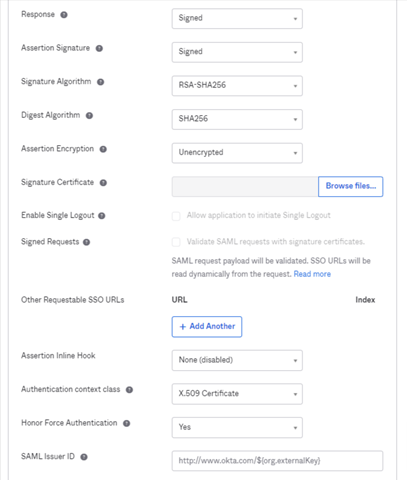
- Continue to the Attribute Statements section.
Attribute Statements
The Attribute Statements section lets us match Okta user profile field values to SAML attributes.
- Enter the attribute statements exactly as follows:
Name Name Format Value FirstName Unspecified user.firstName LastName Unspecified user.lastName Email Unspecified user.email FonoloRole Unspecified user.FonoloRole 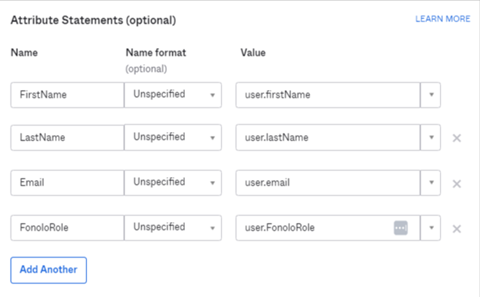
- Select Next to continue. The Feedback tab opens.
Feedback tab
- Select the appropriate response to Are you a customer or partner?.
- Select Finish. The Fonolo app is now set up in Okta.
Sign On Methods
Now that the Fonolo app has been created, you must get the URLs and certificate that are used to finish the SSO integration on the Fonolo side.
- In the Sign On tab of the Fonolo app in Okta, select View Setup Instructions. The How to Configure SAML 2.0 for the Application dialog opens.
- Copy the Identity Provider Single Sign-On URL and the Identity Provider Issuer URL to a safe place for use later in setting up SSO in the Fonolo Portal.
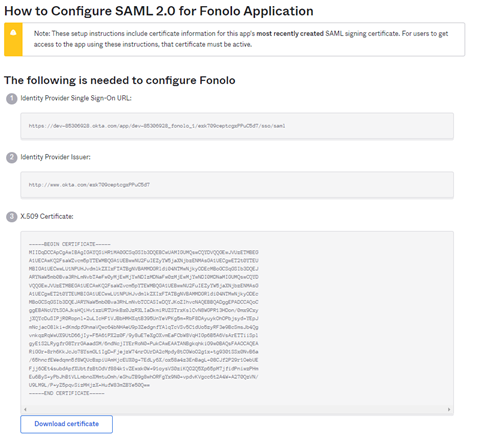
- Select Download certificate and save the certificate file to a safe place for use later in setting up SSO in the Fonolo Portal.
- Go to the Assignments tab of the Fonolo app in Okta to continue.
Assignments
In the Assignments tab, you must assign the Fonolo app to other Okta portal users so that they have SSO access to the Fonolo Portal.
- Select Assign > Assign to People. The Assign App to People dialog opens.
- Choose the users to be given SSO access by selecting the corresponding Assign button.
- Select Done to close the dialog.
Add Attributes
Next, you must define the fields that exist within the Okta user profiles for Fonolo.
- Go to Directory > Profile Editor.
- Select the profile of the new Fonolo app. The Profile Editor opens.
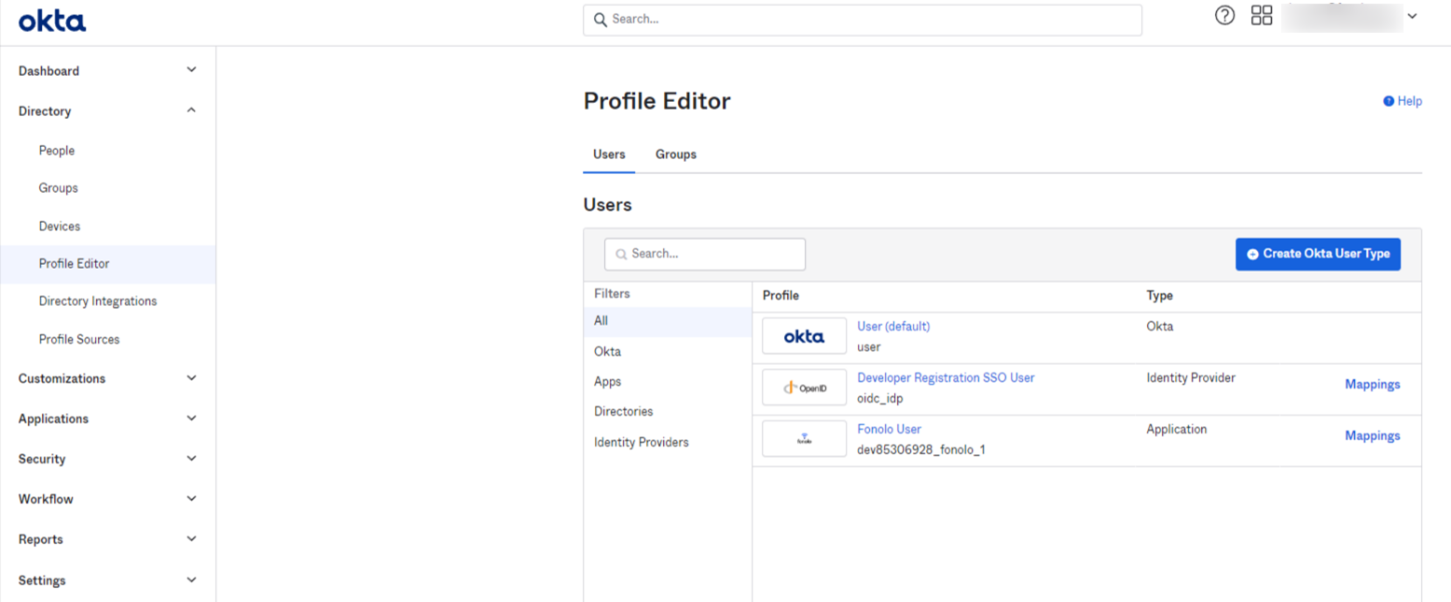
- Select the Fonolo user
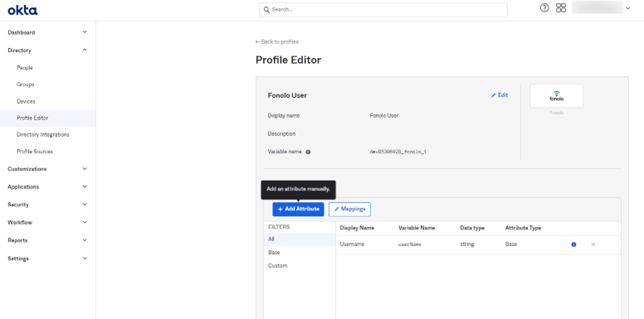
- Select Add Attribute. The Add Attribute dialog opens.
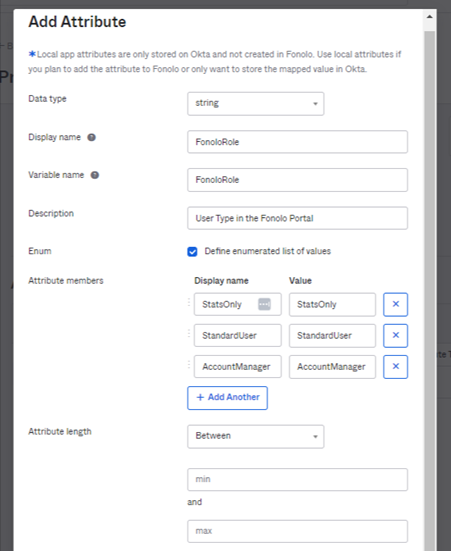
FonoloRole Attribute
- Enter the attribute exactly as follows. Fields that are not specified can be left as default:
The following table shows the required values for the Attribute members field when setting up the FonoloRole attribute:Field Value Data type string Display name FonoloRole Variable name FonoloRole Description The user role in the Fonolo Portal. Enum ✓ (checked) Attribute members (see the following table for values) Display name Value StatsOnly StatsOnly StandardUser StandardUser AccountManager AccountManager - Save the attribute and then select Add Attribute.
FirstName Attribute
- Enter the attribute exactly as follows. Fields that are not specified can be left as default:
Field Value Data type string Display name FirstName Variable name FirstName Description First Name - Save the attribute and then select Add Attribute.
LastName Attribute
- Enter the attribute exactly as follows. Fields that are not specified can be left as default:
Field Value Data type string Display name LastName Variable name LastName Description Last Name - Save the attribute and then select Add Attribute.
Email Attribute
- Enter the attribute exactly as follows. Fields that are not specified can be left as default:
Field Value Data type string Display name Email Variable name Email Description Email - Save the attribute and then select Map Attributes to continue. The User Profile Mappings window opens.

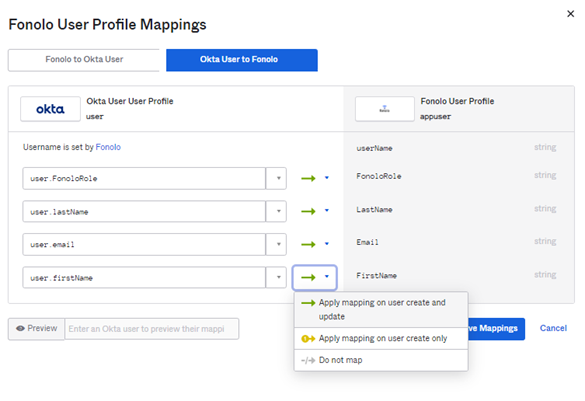
- Go to the Okta to Fonolo tab.
- Select the Okta fields that you defined when setting up the Fonolo app and map them to the appropriate Fonolo User Profile fields using the Apply mapping on user create and update transfer option.
- Select Save Mappings and then Apply updates now.
Assign FonoloRole type
Fonolo has three role types that can be assigned to your users that will provide varying levels of access to the Fonolo Portal. You can visit Account Types for more information.
In order to set a user role type:
- Go to Directory > People and then select the user that you would like to assign a role to.
- Go to the Profile tab and select Edit.
- Choose the appropriate role type from the FonoloRole attribute drop-down list.
- Select Save.
Set Up the Fonolo Portal
Next, you must configure the Fonolo Portal for SSO.
- Log in to the Fonolo Portal as a user with the Account Manager role.
- Go to Admin > Settings > Security > Single Sign-On.

- Select Add Single Sign-On Profile. The Update SSO Profile dialog opens.
- Set up the SSO profile:
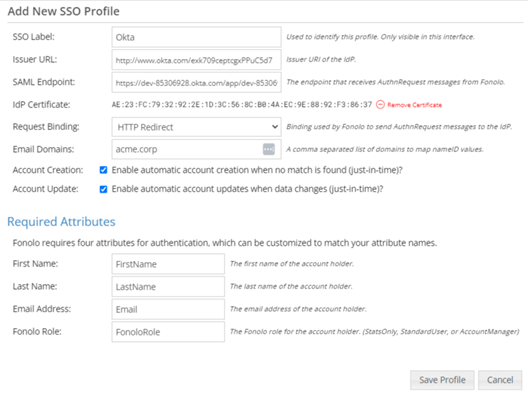
- Enter a name for the SSO Profile in SSO Label. This name will be used within the Fonolo Portal.
- Paste the Identity Provider Issuer URL that was saved in the Okta Portal into Issuer URL.
- Paste the Identity Provider Single Sign-On URL that was saved into SAML Endpoint.
- Select Browse next to the IdP Certificate field and select the X.509 Certificate that was downloaded. The certificate uploads and processes automatically.
- In Request Binding, select HTTP Redirect.
- In Email Domains, enter the domains of the corporate email addresses your users will use to sign in. Do not enter webmail domains (gmail, hotmail, yahoo).
- Make sure that the Account Creation and Account Update check boxes are selected. This lets you generate and update Fonolo Portal user accounts during SSO login.
- Select Save Profile. The SSO setup is now complete.
Test the Login
To test out the new SSO connectivity:
- Log in as a new user in the OneLogin Portal that you have added the Fonolo app to.
- Select the Fonolo Portal Login app. The Fonolo Portal opens, with the user logged in with the role given in the OneLogin Portal.