Click on ‘Add New Member’ (1) to add a new SIP Trunk to the SIP Trunk Group.
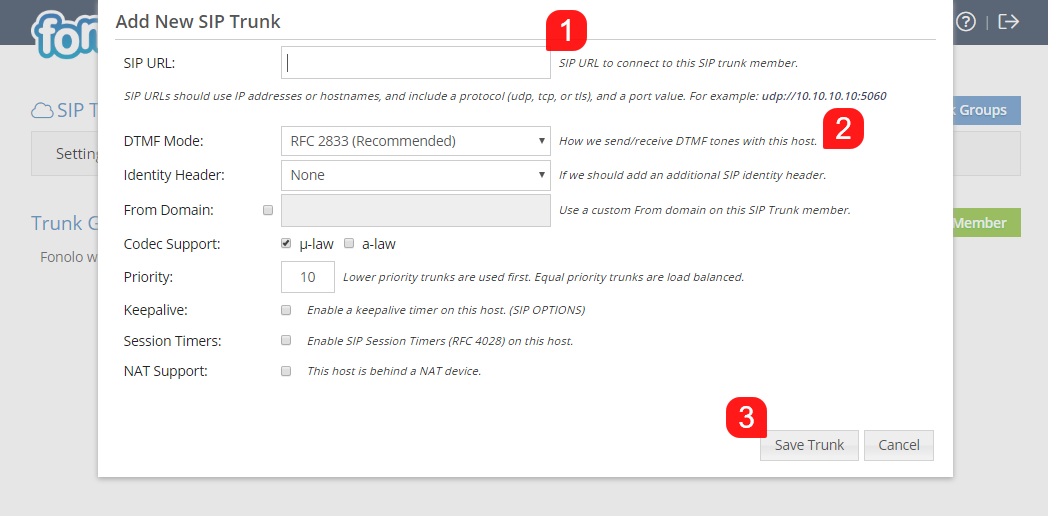
When adding a new SIP Trunk, you will first need to enter the SIP URL (1) as per the below screenshot. This should be in the format of udp://10.10.10.10:5060 where the protocol, IP address, and port number are listed in the appropriate format, and match the settings that Fonolo will use to connect to your phone system.
Next, select (2) the DTMF Mode that you are using, Identity SIP Header and the Codec that you are using (u-law being the most common). Priority will determine which SIP Trunk is used, with a lower number signalling a higher preference. If two SIP Trunk have the same Priority, load balancing will take effect between those SIP Trunks.
From Domain allows you to create a single P2P SIP trunk in your phone system with the private domain name that will resolve to Fonolo SIP gateway IP addresses/Appliance IP Addresses.
Keepalive will send “SIP OPTIONS” packets over the SIP Trunk to confirm that the other party is still receiving packets, regardless of whether there is an active call or not.
SIP Session Timers allow for a periodic refresh of SIP sessions through a re-INVITE request while a call is active. This is to ensure that calls are being received on the other end and to prevent situations where a call might run indefinitely on one end if the other side has lost the connection.
When NAT Support is activated (must be 1-to-1 NAT), Fonolo will wait for packet information to be received from the company’s phone system in order to determine the IP/port to respond to with SIP call data. Since NAT hides a private IP address behind a public IP address, when NAT Support is activated, Fonolo can wait for initial SIP packets in order to know where to send the responses.
Once the settings have been selected, click the grey ‘Save Trunk’ button (3) at the bottom of the popup.

