This integration guide describes the configuration steps required to provide web call-backs (WCB) for customers visiting a website or other application that has added WCB functionality. Fonolo WCB is a cloud-based service that can provide functionality to web users who would like to get a call from a live call center agent.
When a customer visits the company website, they are presented the WCB widget as a pop up or embedded within the page. They can select an option and enter their phone number. They can also select whether they want a call-back from the next available agent or, optionally, if they would like to schedule a call-back for a later time.
When the user selects Start Call, Fonolo calls the Twilio Flex call center over the public switched telephone network (PSTN) with an automated call that enters the queue and waits on hold for the next available agent. When an agent becomes available, Fonolo whispers a message to the agent that tells them that a call-back was requested and that they must press DTMF 1 to trigger the call-back. After receiving the key press from the agent, Fonolo dials out to the caller’s confirmed call-back number, through PSTN, and connects them to the agent.
Interoperability Between Fonolo and Twilio Flex
After the customer has requested a WCB from the widget, Fonolo places a call to a Twilio phone number that is then sent to a Flex agent. This call is made over the PSTN. The outbound call from Fonolo to the call-back number is also made over the PSTN.
The Web Call-Back Process
The following steps outline the call-back process. In our example, the process is initiated by a user visiting a website with a Fonolo WCB deployment.
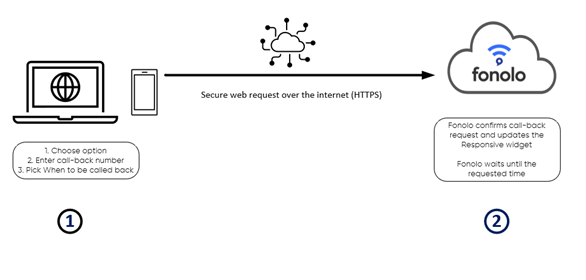
- The caller navigates the website and visits the page where the WCB widget is deployed. They select a valid option from the widget and enter a phone number and a time they want to receive a call-back. The caller selects Start Call.
- A secure web request is sent from the WCB widget to the Fonolo Cloud, where the call-back request is registered.
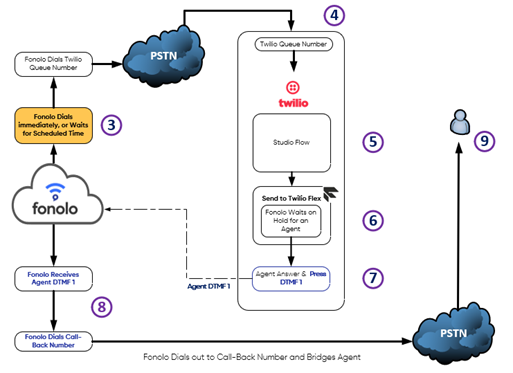
- Fonolo dials into the Twilio Flex call center with a phone number unique to each queue option. Depending on your Fonolo service settings and the caller’s selection, this call can either be an immediate call-back or a scheduled call-back for some time in the future. If it is a scheduled call-back, Fonolo waits to place the call into the Twilio Flex number until the appropriate time.
- The call is answered by Twilio and then sent to a Studio Flow that is configured for each individual queue.
- Twilio Studio Flow sends the call to Twilio Flex using a simple path.
- Fonolo waits on hold in the appropriate Flex queue until the next available agent.
- When the agent becomes available, their phone rings, and when they answer, a repeating Fonolo whisper message plays that tells them that “there is a caller requesting a call-back. Press 1 to connect now”. The message repeats until the agent presses DTMF 1.
- When Fonolo receives the 1 from the agent, we call the confirmed call-back number. When the caller picks up, Fonolo bridges the agent with the caller so that the agent can greet them directly.
- The call begins and, from now on, acts just like any other.
Responsive Web Call-Backs
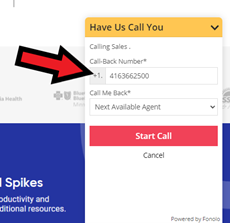
Visitors navigating the company website are shown the pop-up WCB widget in the bottom right corner, when deployed.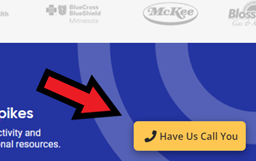
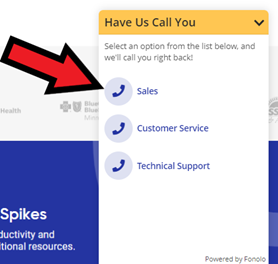
When a visitor selects the pop-up button, they are shown a list of queues they can choose between, depending on who they want to speak to. In our example, there are three options: Sales, Customer Service, and Technical Support.
After the desired queue is selected, the caller enters the number that they would like to be called back on.
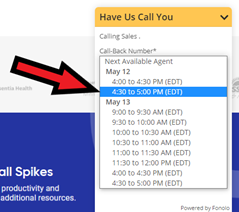
Optionally, the caller can choose to get called back from the next available agent or schedule a future time slot for a call-back.
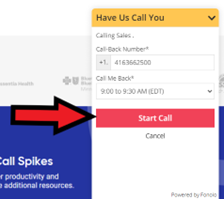
The caller selects Start Call. A secure web request is sent to the Fonolo Cloud and the call-back is registered. The caller can expect a call-back from an agent, and they can choose to either close the WCB widget and browse while they wait or monitor the call-back process by keeping the WCB widget open.
Fonolo dials into the chosen queue to wait for an agent.
Reference Configuration
Acme Corp. is a simulated company that is used in this example to set up web call-back service for three Twilio Flex queues. To accommodate the three queues, three phone numbers are provisioned from Twilio and directed to the corresponding Studio Flows. From the Studio Flow, a Send to Flex widget is used to send the caller to the appropriate Twilio Flex queue.
Additionally, Fonolo dials out to the caller using Fonolo PSTN carriers.
Sales Queues
- Acme Corp’s Twilio Inbound Sales Queue Number is +1 289-270-5366.
- Acme Corp’s Twilio Studio Flow for the Sales Queue is named SalesFlow.
- Acme Corp’s Twilio Taskrouter Sales Task Queue Name is Sales (with skill attribute “skills” : “Sales”).
Customer Support Queues
- Acme Corp’s Twilio Inbound Customer Service Queue Number is +1 289-270-5382.
- Acme Corp’s Twilio Studio Flow for the Customer Service Queue is named CustomerServiceFlow.
- Acme Corp’s Twilio Taskrouter Customer Service Task Queue Name is CustomerService (with skill attribute “skills” : “CustomerService”).
Technical Support Queues
- Acme Corp’s Twilio Inbound Technical Support queue number is +1 289-270-5384.
- Acme Corp’s Twilio Studio Flow for the Technical Support queue is named TechnicalSupportFlow.
- Acme Corp’s Twilio Taskrouter Technical Support task queue name is TechnicalSupport (with skill attribute “skills” : “TechnicalSupport”).
Twilio Configuration Steps
To add Fonolo WCB with Twilio, the following steps must be completed:
- Assign Skills to Flex Agents
- Create a Task Queue
- Create a Taskrouter Workflow
- Set up a Studio Flow
- Gather Twilio Numbers and Assign them to Studio Flow
Assign Skills to Flex Agents
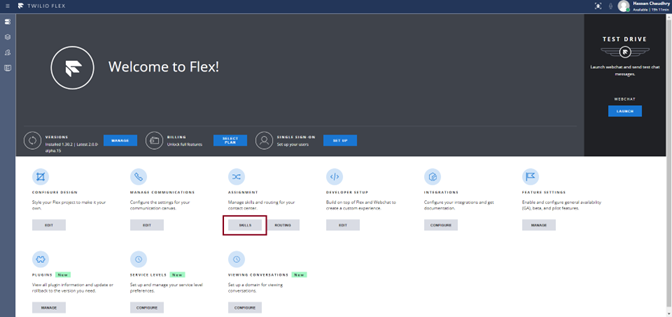
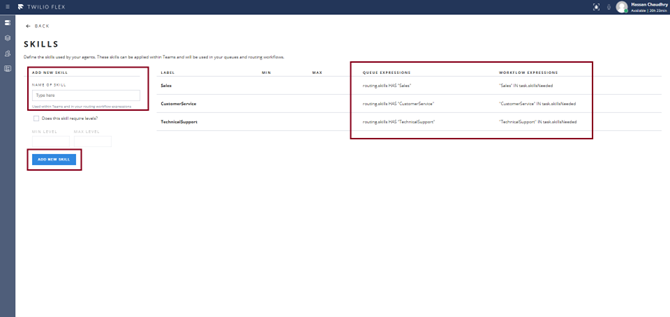
First, we must define our skills in the Flex Admin view in Twilio Flex.
- Log in to Twilio Flex with an Administrator account and go to Admin > Assignments > Skills.
- Create a new skill by entering a skill name and selecting Add New Skill. Note the queue and workflow expressions that are generated after creating the skill. In this example, we add three skills named Sales, CustomerService, and TechnicalSupport.
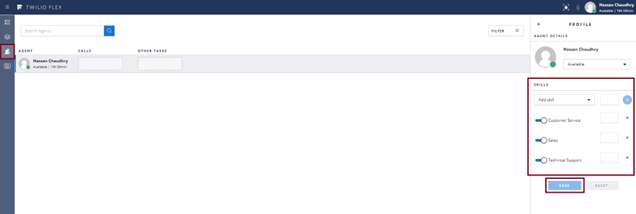
- Next, we must assign these skills to flex agents. Navigate to the Flex Teams view by selecting the profile icon on the left sidebar and select an agent.
- Apply the appropriate skill from the drop-down list.
- Select Save.
- Repeat steps 3 to 5 until all skills have been added to the flex agents.
Create a Task Queue
Task queues, workflows, and studio flows define the path of the incoming Fonolo placeholder call and direct it to an appropriate agent. We must create a task queue in Twilio Taskrouter for each queue shown to the caller in the WCB widget.
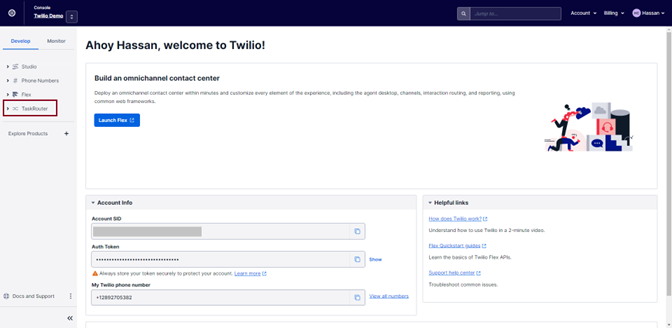
- Go to your Twilio Console and make sure you are logged in as an Administrator.
- In the Develop menu, find and select Task Router. If it is not already pinned, you can search for it by selecting Explore Products.
- Select Task Queues > Create a New Task Queue.
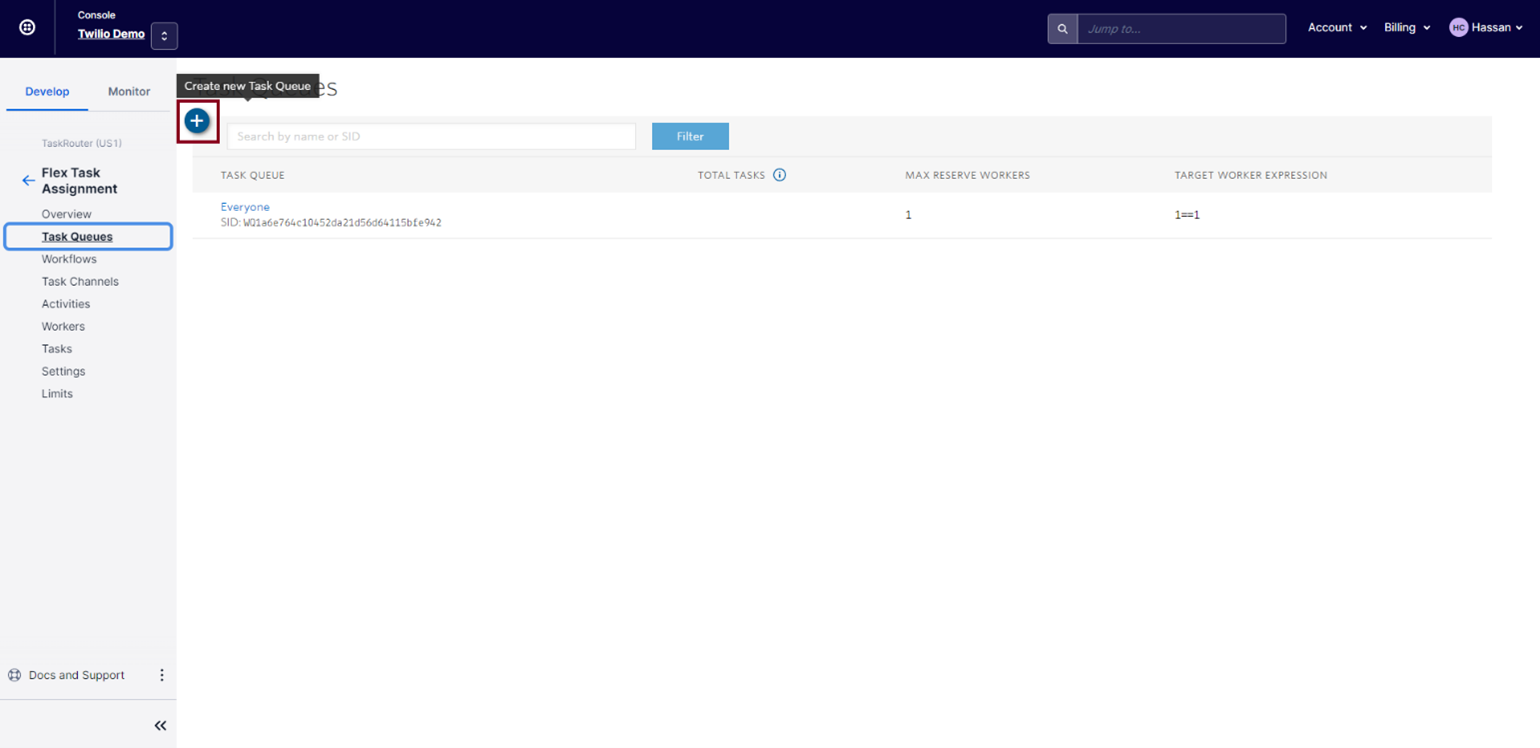
- Enter the appropriate details, including the Task Queue name and Queue expression, and then select Save.
- Repeat steps 3 and 4 for each task queue you need to create. Once they are configured, they are listed in the Task Queue view.
Create a Taskrouter Workflow
Taskrouter workflows define the logic used to deliver tasks to the appropriate task queue. We can use expressions to create skill- or attribute-based routing. For our example, we need three workflows: one for each task queue.
- In the Twilio Console Develop menu, go to Workflows > Create a New Workflow.
- Add a workflow name, define Matching Tasks, and enter an Expression that will be used to route the caller.
- Select Create to save the workflow.
For our example, we created three workflows. The Matching Task and Expression values change to reflect each queue’s individual skill.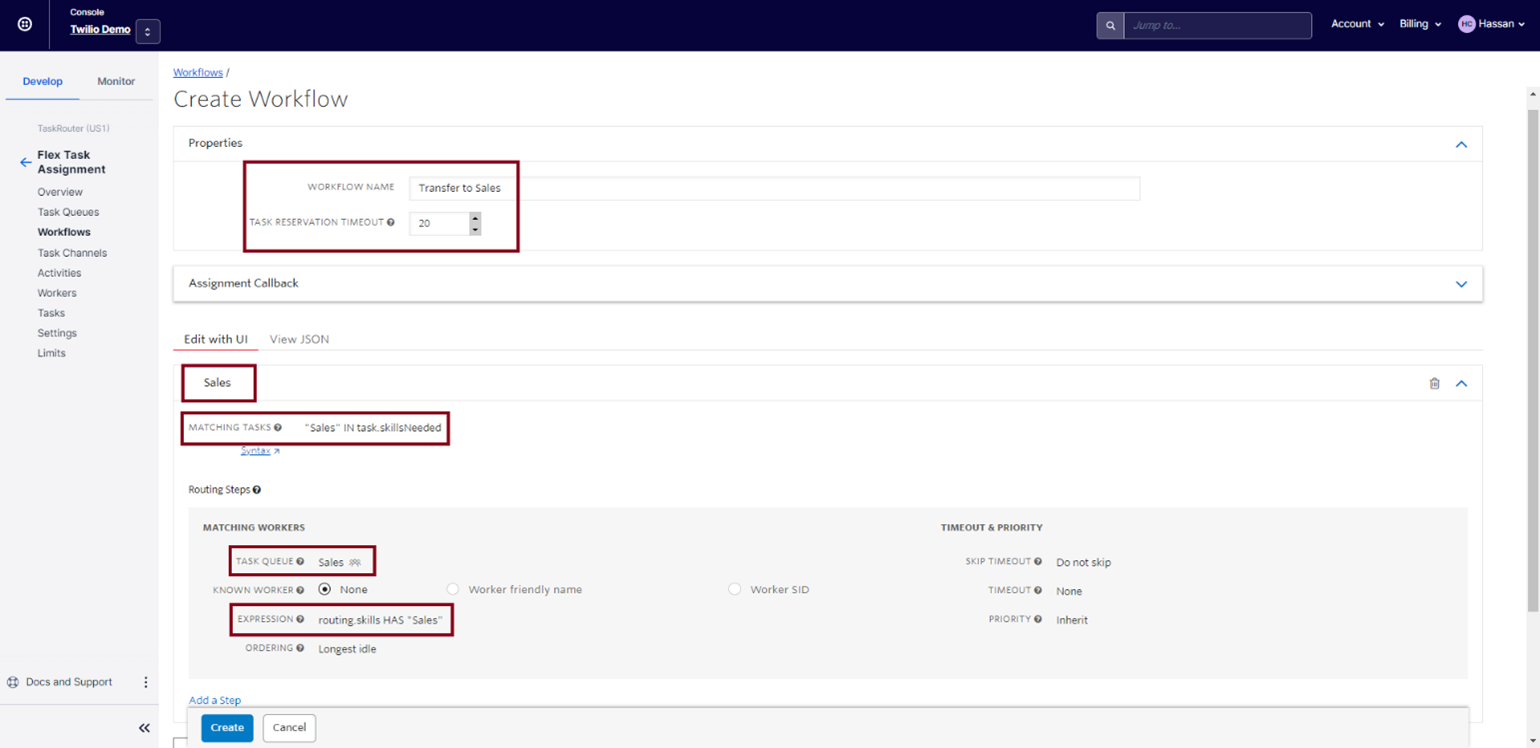
When complete, your workflows should be shown on the Workflows page.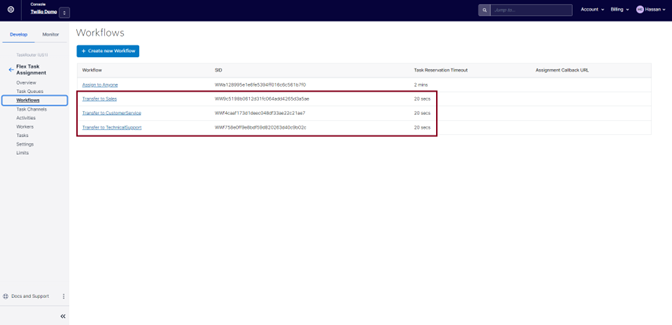
Set up a Studio Flow
After the task queues have been defined, create a studio flow that will accept the incoming calls from Fonolo and direct them to the appropriate agent. In our example, we need to create three studio flows, one for each queue and unique incoming number.
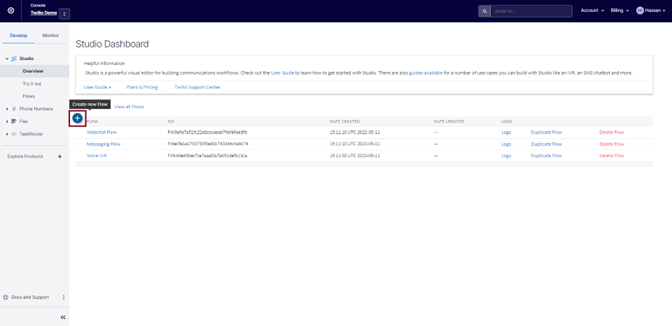
- Go to Studio > Overview.
- Create a new flow by selecting Create New Flow. The Studio Flow editor opens.
- Change the name of the flow by selecting Trigger Module and entering a new name.
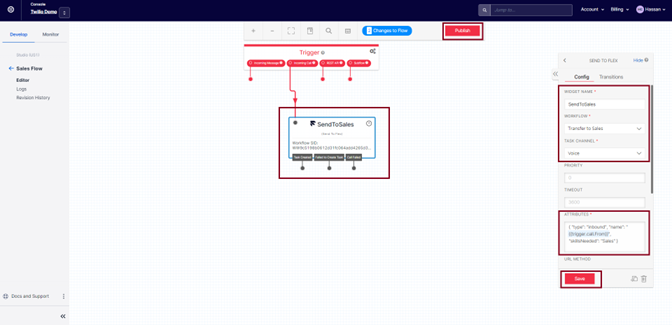
- Find and add the Send To Flex widget to the editor pane.
For our example, we rename this widget ‘SendToSales’, select Transfer to Sales Workflow (created in the previous section), and then select the appropriate Task Channel (Voice), adding the following Attributes:
{ “type”: “inbound”, “name”: “{{trigger.call.From}}”, “skillsNeeded” : “Sales” }
- Select Save.
- Add a connector between the incoming call trigger and the Send To Flex widget. Save and then Publish to have the studio flow go live.
- Repeat steps 2 to 6 for the remaining three queues, adjusting the settings of the queues with the corresponding skillsNeeded attribute values.
Gather Twilio Numbers and Assign them to Studio Flow
Now that we have created our skills, assigned them to agents, created a task queue and workflow, and developed an incoming route using studio flows, the final step is to gather Twilio phone numbers and assign them to each of the studio flows that have been created.
- On the sidebar, go to Phone Numbers > Active numbers. The available numbers on the account are listed.
- If there are no free numbers available, select Buy a number and purchase them from there.
- Select any unassigned numbers to use for the incoming calls from Fonolo. In our example, we choose three numbers for our three queues.
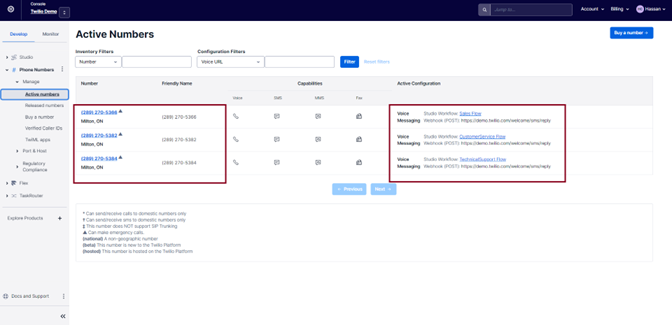
- Select a phone number. Its configuration page opens.
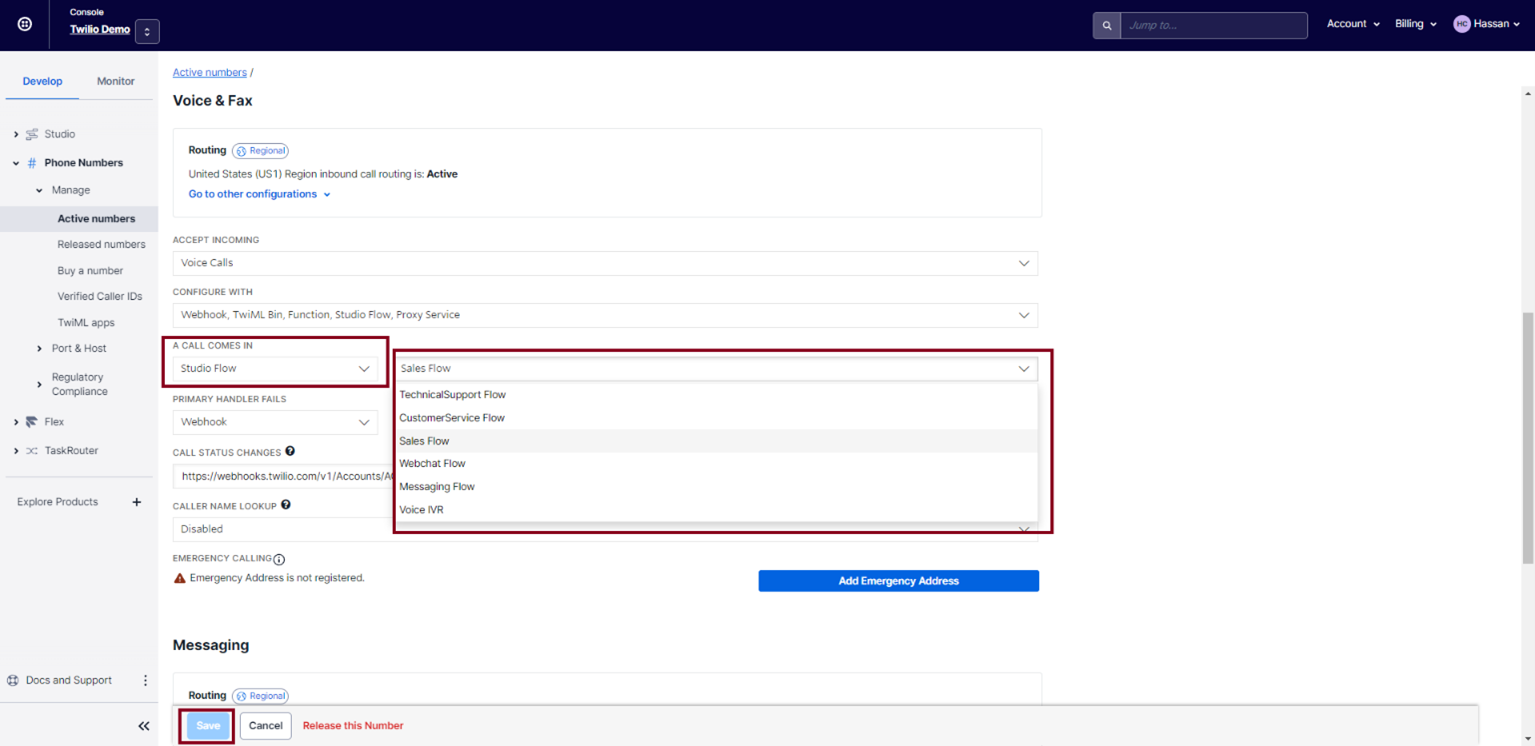
- Go to the Voice & Fax section and then select Studio Flow in the A call comes in drop down menu.
- Select the appropriate flow for the number you are configuring. In our example, we configure a unique number for each of our three flows (Sales, CustomerService, TechnicalSupport).
- Select Save.
The Twilio call center has now been set up to allow Fonolo to dial in and reach a Flex agent!
In our example, we now have three unique numbers that, when dialed, go to a different Twilio studio flow and direct the call to the associated flex task queue. The workflow distributes the Fonolo call to the appropriately skilled agents, who then initiate the call-back to the client by pressing DTMF 1 on their keypad.
Fonolo Portal Configuration Steps
Next, we must configure the Fonolo Portal to create the web call-back widget and activate the call-back service.
Fonolo configures the following as part of the implementation process. Our support team will be with you every step of the way! For more details on what else we need from you to complete the integration, go to the Direct PSTN Configuration Guide.
- Set up Target Number
- Set up Responsive Web Rescue Call-Backs Profile
- Deploy JavaScript Code
Set up a Target Number
A target is an entry point into the queue that Fonolo uses to place a call and wait on hold on behalf of the caller. Fonolo must connect directly into the queue using this target, bypassing the IVR. For more information on setting up a target, go to Adding a New Target.
For our example, the target numbers for each queue are as follows:
- Twilio Sales Queue: +1 289-270-5366
- Twilio CustomerService Queue: +1 289-270-5382
- Twilio TechnicalSupport Queue: +1 289-270-5384
Set up a Web Call-Back Call-Back Profile
A Call-Back Profile is a collection of settings and configurations that define parameters for the calls that Fonolo places for you. For more information on setting up call-back profiles, including for web call-backs, go to How to Create and Customize a Responsive Rescue Widget and How to Configure a Call-Back Profile > Settings.
Add the created targets to the call-back profile as Call Options. For more information on adding call options, go to How to Configure a Call-Back Profile > Call Options.
Deploy JavaScript Code
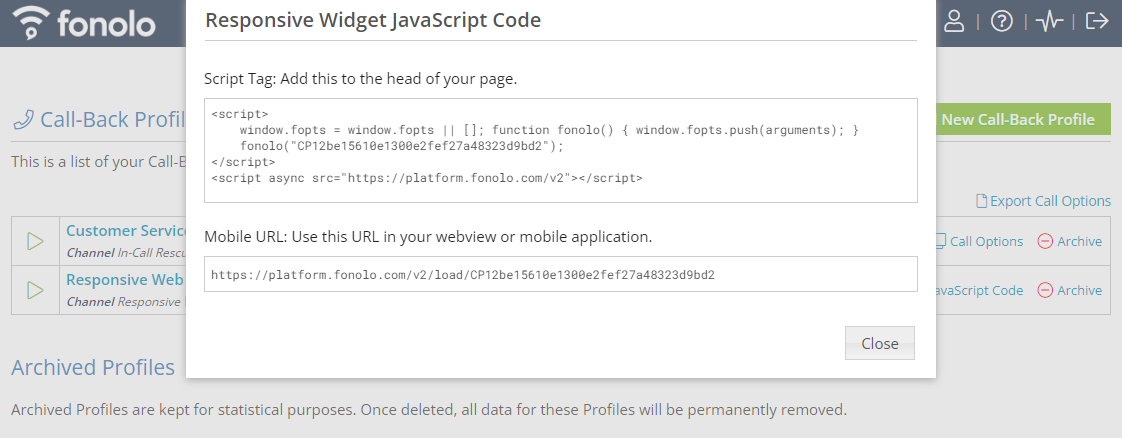
After all the targets have been added as call options to the call-back profile, the code that displays the web call-back widget can be deployed on the chosen web page. The code is automatically generated by the Portal.
- In the Fonolo Portal, go to Manage > Call-Back Profiles.
- Select JavaScript Code on the chosen call-back profile. The profile must be the Responsive Web Rescue channel for the selection to appear.
- Choose a method of deploying the widget:
- The Script Tag code can be placed in the head of the chosen web page. The widget will be deployed when the update is pushed to production.
- The Mobile URL can be placed in either an iframe that is embedded within the web page, or within a button that triggers a popup with the URL, ultimately making the widget open.
After deployment, any visitor can now navigate to your website and start a web call-back with the widget.
Further Information
For more information about the Fonolo Portal, please visit our Help Site or contact us at our support line.