A Call-Back Profile is a collection of settings and configurations that defines the calls that Fonolo receives and places for you.
Editing call-back profiles requires a Fonolo Portal account with the Standard or Account Manager role. To configure an existing call-back profile:
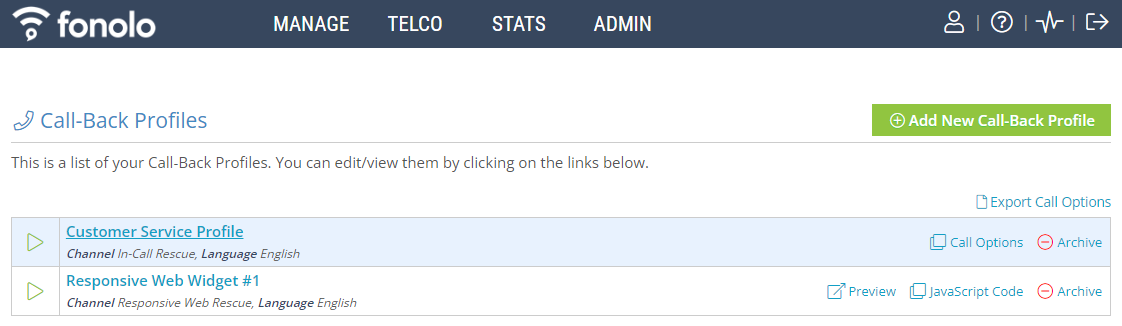
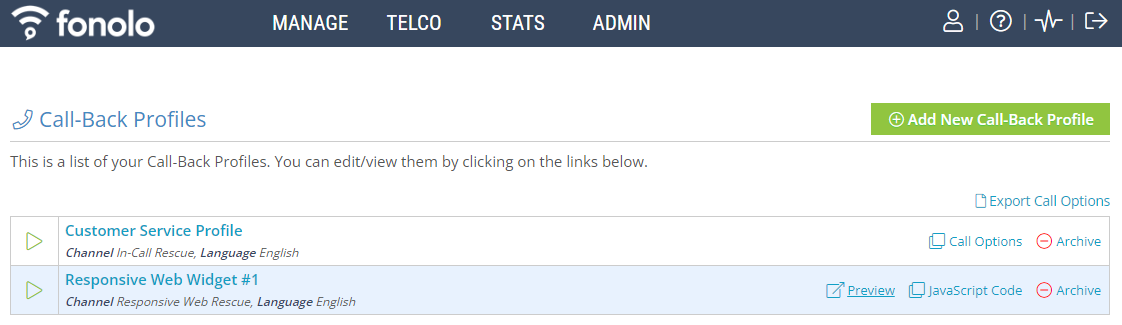
- Go to Manage > Call-Back Profiles.
- Select the call-back profile you want to edit.
Settings Tab
The Settings tab is already configured when the Call-Back Profile was set up. Here, you can change some of those selections.
Settings
Edit the basic settings of the call-back profile.
| Field | Value |
|---|---|
| Profile SID | (Read-only) Shows the assigned system ID (SID) of the call-back profile. |
| Profile Label | Enter a name for the call-back profile. This name will appear in reports and statistics generated by the Fonolo Portal. |
| Geo. Whitelist | Select an allow list of countries and regions that Fonolo is allowed to place calls within. Go to Localization for more information on creating geographic whitelists. |
| Channel | Choose the type of call-back the profile is attached to:
This field is configured upon call-back profile creation and cannot be changed afterwards. |
| Language | Choose the language the queue will handle. This field is configured upon call-back profile creation and cannot be changed afterwards. |
| Customer CID Number | Enter the phone number that is shown to the caller when they receive their call-back from Fonolo. We recommend entering your service center phone number, to help identify you to the caller. |
| Customer CID Name | Enter the name that is shown to the caller when they receive their call-back from Fonolo. We recommend entering your company name, to help identify you to the caller. |
| Agent CID Number | Enter the phone number that is shown to your agents when they receive the placeholder call from Fonolo. The macro {{$client_number}} will show the caller’s call-back number as the Agent CID Number. |
| Agent CID Name | Enter the name that is shown to your agents when they receive the placeholder call from Fonolo. We recommend entering “Fonolo”, to tell your agents that this is a call-back and not a real caller (yet!). |
Caller ID Settings
Edit the caller ID (CID) name and number seen by callers when they receive a call-back or agents when they receive the Fonolo placeholder call.
| Field | Description |
|---|---|
| Client CID Number | Enter the phone number that is shown to the caller when they receive their call-back from Fonolo. |
| Client CID Name | Enter the name that is shown to the caller when they receive their call-back from Fonolo. |
| Agent CID Number | Enter the phone number that is shown to your agents when they receive the placeholder call from Fonolo. |
| Agent CID Name | Enter the name that is shown to your agents when they receive the placeholder call from Fonolo. |
There are a number of macros you can enter into the Caller ID Settings field to change what appears.
| Macro | Result |
|---|---|
{{$client_number}} | Enter to make the caller’s call-back number appear as to the agent when they receive the Fonolo placeholder call. When using this macro without an attribute, the phone number will appear in whichever format Fonolo received the number in. |
{{$client_number:E164}} | Enter to show the caller's call-back number in the E.164 format. |
{{$client_number:INT}} | Enter to show the caller's call-back number in the International format, with the number's country code also shown. |
{{$client_number:NAT}} | Enter to show the caller's call-back number in the National format, with the number's country code not shown. |
Confirm all the settings on this tab, and then select Save Changes to update the call-back profile.
Call Options Tab
Call options determine three main things:
- Which targets use the settings defined in the call-back profile.
- The Fonolo extension that callers who have opted in to a call-back will be transferred to by your queue.
- (Web call-backs only) The queues, including the order they are listed in, that the caller can select.
Call Options
A target is the tool Fonolo uses to call in to your phone system. When a call-back profile opt-in method is attached to a target, it becomes a Call Option. Targets can be used multiple times to call into the same queue with different opt-in methods within one call-back profile or across multiple profiles.
To add a target to the call-back profile call options:
- Select a target from the drop-down list.
- Select Add Option.
The target now follows the settings of the current call-back profile.
Move, edit, or delete call-back profile call options
You can Move, Edit, or Delete these targets from the call-back profile by selecting the appropriate option.

Move lets you transfer a target to another call-back profile without needing to recreate it:
- Select Move next to the call option you want to transfer. The Move Option dialog opens.
- Select the new call-back profile to move the option to.
- Select Move Option.
Edit lets you configure the extension and caller ID of the call option:
- Select Edit next to the call option you want to edit. The Option Settings dialog opens.
- Edit the settings as appropriate. Go to Option Settings for more information.
- Select Save Option.
Delete lets you remove the call option from the call-back profile. Selecting Delete opens the Delete call option dialog. Select Delete Option to remove it from the profile.
(Responsive Web Rescue call-back profiles only) Use the hamburger icon to change the order of the target options. The call back options will appear in the web call-back widget in the order they appear here.
Option Settings
After adding a target as a call option, select Edit to open the Option Settings dialog. Settings within this dialog control how call-backs behave when callers opt in to a call-back through this call option.
| Field | Description |
|---|---|
| Option SID | (Read-only) Shows the assigned system ID (SID) of the call option. The SID is used for API reporting and for starting call-backs through the API. Go to Custom REST API Call-Back Requests for more information. |
| Option Label | Enter a new name for the call option. By default, the name of the Option Label is the same as the target. If the target is used in multiple call-back profiles or multiple times in the same profile, you may want to edit the name for reporting purposes. |
| Fonolo Extension | (Voice call-backs only) The extension that callers who have opted into a call-back are transferred to. Selecting # Assign Number opens the Assign Phone Number dialog. The dialog shows a list of DIDs that have been assigned to you by Fonolo. You can select a number from the list to assign it to the call option. If you are connecting to Fonolo through PSTN, this will be a DID number. If you are connecting to Fonolo through SIP, it will be a SIP extension. This extension is provided to you by Fonolo. Do not change it without contacting Fonolo Support first. |
| Override the default country code for this option? | Select to override the default country code of the call-back profile that is shown to the caller when returning a call-back. |
| Dialing Area | Choose the country code to display with the call option. |
| Override the client caller ID values for this option? | Select to override the default client caller ID values of the call-back profile that is shown to the caller when you return their call-back. |
| Client CID Number | Enter the caller ID number that is shown to the caller when you return their call-back. |
| Client CID Name | Enter the caller ID name that is shown to the caller when you return their call-back. |
| Override the agent Caller ID values for this option? | Select to override the default agent caller ID values of the call-back profile that is shown to agents when they get a call-back request. |
| Agent CID Number | Enter the caller ID number that is shown to agents when they get a call-back request. |
| Agent CID Name | Enter the caller ID name that is shown to agents when they get a call-back request. |
Once all settings have been configured, select Save Changes.
Telco Settings Tab
Call-back profile Telco settings determine two things:
- The method that Fonolo will use to call your callers back.
- The method by which calls will be transferred from your system to Fonolo
Client Call-Back Method
The client call-back method controls how Fonolo calls your callers back.
| Field | Description |
|---|---|
| Direct PSTN | Select to offer call-backs through PSTN in this call-back profile. |
| Direct SIP | Select to offer call-backs through SIP in this call-back profile. You can also choose what SIP trunks your calls will route through. Go to How to Add a New SIP Trunk for more information on adding SIP trunks. |
| Call Routing | (Direct SIP only) Choose how numbers in this call-back profile that use the SIP trunk are formatted. Custom formats can be used. Go to How to Set Up Call Routing for more information on adding call routing formats. |
| Dial Timeout | (seconds) Choose how long Fonolo waits when dialing the caller before returning a Client Call Timeout error. The default value is 60 seconds, with a minimum value of 10 seconds and a maximum of 120 seconds. |
(Voice Call-Backs Only) In-Call Rescue Call Transfers
The in-call rescue call transfer controls how callers who opt into a call-back over the phone are transferred from your system to Fonolo.
| Field | Description |
|---|---|
| Test Phone Number | (Direct SIP only) Select to open a dialog that lets you enter a 10-digit number to test its format when making an outbound call through Fonolo. |
| Direct PSTN | Select to transfer calls to Fonolo DIDs over PSTN. |
| Direct SIP | Select to transfer calls to Fonolo over the selected SIP trunk group. |
| Failed Transfers | (Direct SIP only) Select to have Fonolo return failed call-back requests to your phone queue. |
| Validation | Choose to evaluate a caller’s number as either a valid phone number or using Perl-compatible regular expression. |
| Default Dialing Area | (Validate as a Phone Number only) Choose the dialing area that the phone numbers will be validated against. |
| Regex | (Validate using a Regex (PCRE) only) Enter a Perl-compatible regular expression that caller phone numbers will be validated against. |
(Web Call-Backs and Programmable Call-Backs Only) Call-Back Number
The call-back number settings determines how a call-back number is validated.
| Field | Description |
|---|---|
| Validation | Choose to evaluate a caller’s number as either a valid phone number or using Perl-compatible regular expression. |
| Default Dialing Area | (Validate as a Phone Number only) Choose the dialing area that the phone numbers will be validated against. The selected area will appear as the default option on the web call-back widget. |
| Regex | (Validate using a Regex (PCRE) only) Enter a Perl-compatible regular expression that caller phone numbers will be validated against. |
Once all settings have been configured, select Save Changes.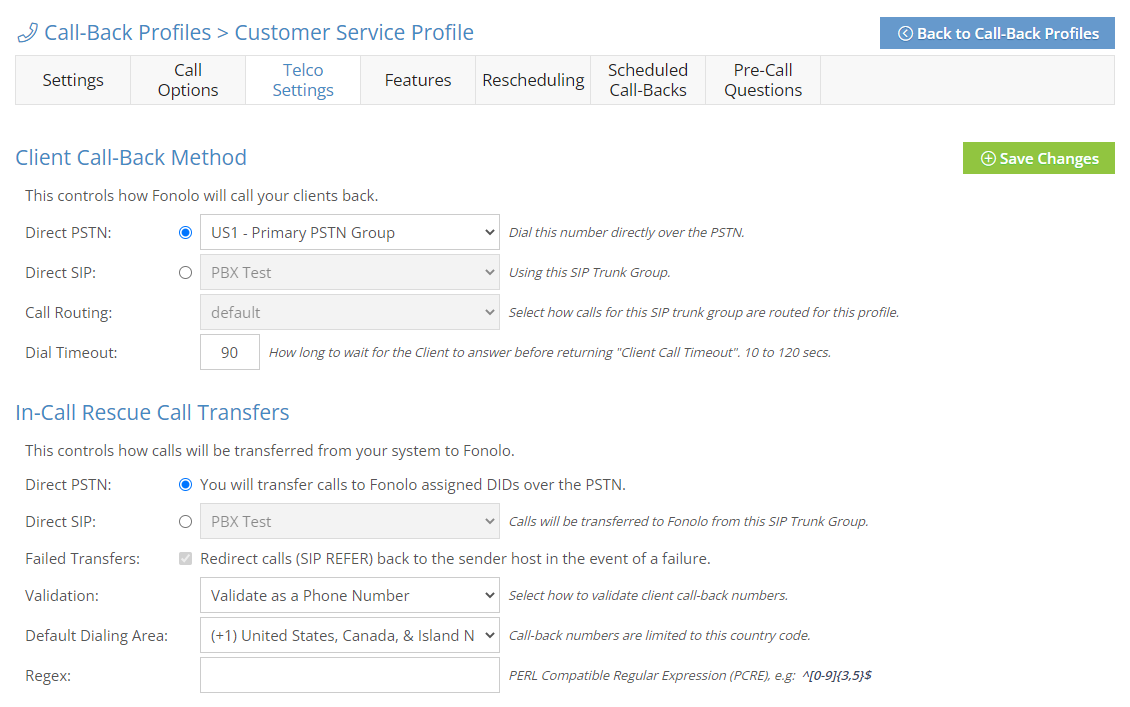
Features Tab
Call-back profile Features are settings and configurations that let you customize the call-back experience for both the caller and the agent.
Audio Settings
Change the audio prompts that both callers and agents hear during the call-back process by choosing an audio profile for the call-back profile to use.
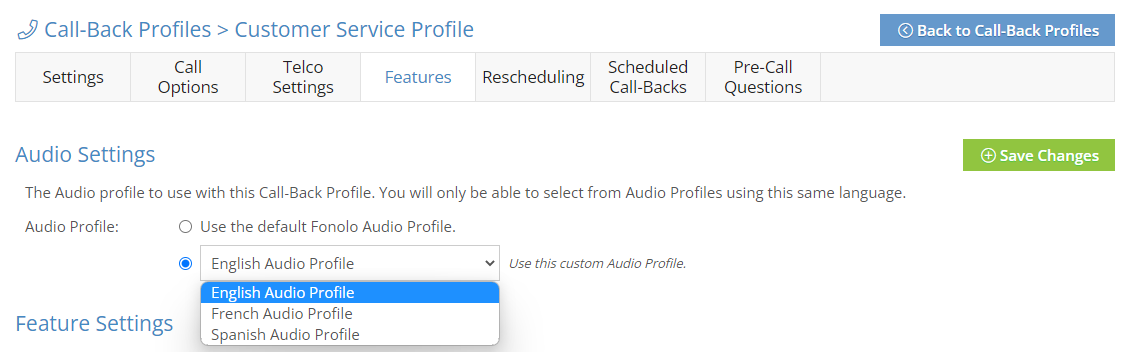
Go to What is an Audio Profile? for more information about audio profiles.
Feature Settings
Use the feature settings to customize the call-back process.
| Field | Description |
|---|---|
| Use Caller ID | (Voice call-backs only) Select to have the caller ID read back to the caller. The caller will be asked to confirm it as the number that will get the call-back. |
| Auto Dialing Area | (Voice call-backs only) Use the caller ID and geographic allow list to detect the caller’s dialing area. |
| Duplicate Check | Select to restrict each phone number to one requested call-back at a time. You can also give callers the option of canceling or rescheduling a requested call-back when they try to enter their number more than one time. |
| Enable CAPTCHA | (Web call-backs only) Select to require CAPTCHA validation before starting a call-back. |
| Country Select | (Web call-backs only) Select to show a drop-down menu with country codes in the web call-back widget. |
| Hide After-Hours | (Web call-backs only) Select to hide call options that have closed for the day in the web call-back widget. When cleared, call options that are out of their operating hours are shown, but are disabled. |
| Debug Recording | Select to have the holding process of either all calls or failed calls only recorded for troubleshooting purposes. Once the caller is connected to the phone call, Fonolo does not record any audio. This feature is unavailable for appliance deployments. |
| Global Timeout | (seconds) Set the maximum amount of time, including hold and talk time, that Fonolo lets a call continue. Once the global timeout time is reached, Fonolo ends the call. The default value is 21600 seconds (6 hours), with a minimum value of 600 seconds (10 minutes) and a maximum of 43200 seconds (12 hours). |
SMS Notifications
Use the SMS notifications settings to enable and configure SMS notifications for callers who are waiting for a call-back.
| Field | Description |
|---|---|
| Enable SMS Notifications on this Profile? | Select to enable SMS updates to callers who have opted in for a call-back. |
| SMS Source Number | Choose the phone number that shows to the caller when they receive an SMS notification. SMS source numbers can be provided by Fonolo upon request, or you can port an existing number into the system. Contact Fonolo Support for more information. |
| SMS Profile | Select an SMS profile to use for SMS notifications in the call-back profile. Go to What is an SMS Profile? for more information. |
After making changes in the Features tab, make sure to select Save Changes to have your edits take effect.
Retries Tab
A call-back can be retried automatically if unsuccessful. Call-backs may be retried automatically, by an agent, or by the caller. The Retries tab lets you customize the different options around how this functionality works.
Call-Back Retries
You can control most parts of how a rescheduled call-back works through the call-back rescheduling settings.
| Field | Description |
|---|---|
| Auto Retries | Select to let Fonolo automatically make another call-back attempt when a call-back fails. |
| Client Retries | Select to let callers reschedule their call-back if all retry attempts fail. If all retry attempts fail, Fonolo reaches out to the caller automatically and gives them the option to have the agent try to reach them again. |
| Agent Retries | Select to let agents retry a call-back if they reach voicemail or the call fails. |
| Max Retries | Limit the number of auto and agent retries per call-back. If Client Retries is turned on, callers can choose to retry their call-back more than this limit. |
| Retry Delay | (minutes) (Voice call-backs and programmable call-backs only) Choose the length of the delay between a call-back attempt failing and another attempt being made. The default value is 0 minutes, with a minimum value of 0 minutes and a maximum of 120 minutes (2 hours). |
| Cut-Off Time | (minutes) Limit how close to the end of the target hours of operation that call-backs can be retried. Go to Hours of Operation for more information. The default value is 15 minutes, with a minimum value of 0 minutes and a maximum of 120 minutes (2 hours). |
(Web Call-Backs Only) Appearance Tab
Customize the appearance of the web call-back widget by choosing from a set of pre-selected colors, or by inputting your own HEX codes to exactly match your website design. Each object and text body within the web call-back widget can be changed to meet your needs.
To customize text that appears in the web call-back widget, go to the appropriate Content tab for the element.
Changes that you make to the web call-back widget will be reflected in real-time on the demo widget on the page. The call options on the demo widget are placeholders to show color, font, and formatting. For a preview of your widget with the configured call options, select Preview on the call-back profile in the call-back profile list.
After making any changes to the appearance of the web call-back widget, select Save Changes or Reset to Defaults to keep the current appearance or start over, respectively.
Web Call-Back Customization Sections
Use the widget components menu to change the appearance of components of the web call-back widget.
| Section | Description |
|---|---|
| Main Body Styles | Customize the background color and text style of the main body of the web call-back widget. |
| Header and Footer | Customize the appearance and text style of the widget header and footer. |
| Call Option Styles | Customize the color and text style of the call-back queue options given in the widget. |
| Form Input Styles | Customize the appearance and text style of the input fields. |
| Start Button Styles | Customize the appearance and text style of the button that begins the call-back process. |
| End Button Styles | Customize the appearance and text style of the button that cancels the call-back process. |
| Trigger Button | Customize the color and text style of the button that opens the web call-back widget itself. |
Customization Fields
| Field | Description |
|---|---|
| Background Color | Choose the background color of the selected element. |
| Font Color | Choose the font color of the selected element. |
| Border Color | Choose the border color of the selected element. |
| Start Font Color | Choose the color of the text that appears on the button that begins the call-back process in the widget. |
| Cancel Font Color | Choose the color of the text that appears on the button that cancels the call-back process in the widget. |
| Line Height | Choose the spacing between lines of text of the selected element. |
| Letter Spacing | Choose the spacing between individual letters in the text of the selected element. |
| Font Size | Choose the size of the text of the selected element. |
| Font Family | Select the font of the text of the selected element. |
| Text Direction | Select the alignment of the text of the selected element. |
| Rounded Corners | Select to apply rounded corners to the selected element. |
| Footer Enabled | (Header and Footer) Select to show the Fonolo logo in the footer of the widget. |
| Show Asterisk | (Form Input Styles) Select to place an asterisk next to required fields. |
(Web Call-Backs Only) Content Tab
Customize the text content of the web call-back widget by entering your own messaging to match your brand tone. Each page of the widget is split into sections whose content can be customized independently of each other.
To customize text font, size, letter spacing, or direction, go to the appropriate Appearance tab for the element.
Changes that you make to the web call-back widget will be reflected in real-time on the demo widget on the page. However, the call options on the demo widget are placeholders to show color, font, and formatting. For a preview of your widget with your configured call options, select Preview on the call-back profile in the call-back profile list.
After making any changes to the content of the web call-back widget, select Save Changes or Reset to Defaults to keep the current content or start over, respectively.
Call Options Page
Edit the text that appears on the main call options page of the widget. This page opens when callers select the trigger to open the widget.
| Field | Description |
|---|---|
| Header Title | Edit the text on the header of the web call-back widget. The header text you enter here will appear in all other pages of the widget. |
| Call-Option Text | Edit the text that appears above the call-back options list. |
| Closed Option | Edit the text that appears when a call-back option is unavailable (at capacity or currently out of working hours). |
| Footer Text | If the footer is enabled, edit the text that appears before the Fonolo brand name. The footer text you enter here will appear in all other pages of the widget. |
Call Start Page
Edit the fields and text that appears on the call start page of the widget. This page opens when a caller selects a call option.
| Field | Description |
|---|---|
| Call-Start Text | Edit the text that appears above the other options on the page. The macro {{option}} is automatically replaced by the name of the selected call option. |
| Phone Number Label | Edit the name of the field callers must enter their phone number into. |
| Schedule Call Label | Edit the name of the field where callers can choose when they want to receive their call-back. |
| Immediate Call Label | Edit the name of the option where callers can opt into an immediate call-back. |
| SMS Opt-In | Edit the name of the check box callers can select to receive SMS notifications. |
| CAPTCHA Label | Edit the name of the dialog the CAPTCHA opens in. |
| CAPTCHA Message | Edit the instructions for the CAPTCHA. |
| Start Call Button | Edit the text that appears on the button that starts the call-back process. |
| Cancel Call Button | Edit the text that appears on the button that cancels the call-back process. |
In-Progress Page
Edit the text that appears in the widget after the call-back process begins and the caller is holding.
| Field | Description |
|---|---|
| In-Progress Text | Edit the text that appears to the caller while the call-back is on hold and waiting for an agent. |
| End Call Button | Edit the text that appears on the button that ends the call-back. |
Call Status Messages
Edit the text that appears to update the caller about the status of their call-back. These messages appear on the in-progress page.
| Field | Description |
|---|---|
| Initializing | Edit the text that appears when the call-back has just started. |
| Calling Company | Edit the text that appears when Fonolo is calling into the call option. |
| Holding | Edit the text that appears when the call option has answered the call and is holding for the next available agent. |
| Calling Client | Edit the text that appears after the agent has accepted the call-back and is calling the caller. |
| Progress | Edit the text that appears when the agent and caller have connected and are talking. |
| Completed | Edit the text that appears after the call-back has completed. |
| Canceled | Edit the text that appears after the caller has canceled the call-back. |
| Retrying | Edit the text that appears after a call-back has failed and is being retried. |
| Call Failed | Edit the text that appears after a call-back has failed and all retry attempts are used or if call-back rescheduling is disabled. |
Call Cancel Dialog
Edit the text in the dialog that appears after a caller starts a call-back and then selects the call cancel button.
| Field | Description |
|---|---|
| Dialog Title | Edit the name of the dialog that appears when the caller tries to cancel the call-back. |
| Dialog Message | Edit the message that appears in the dialog when the caller tries to cancel the call-back. |
| Confirm Button | Edit the text that appears on the button that cancels the call-back. |
| Cancel Button | Edit the text that appears on the button that exits the cancel menu and continues the call-back process. |
Scheduled Page
Edit the text in the page that appears after a caller has scheduled a call-back for a later time.
| Field | Description |
|---|---|
| Scheduled Text | Edit the confirmation text that tells the caller that their call-back has been successfully scheduled. The macro {{option}} is automatically replaced by the name of the selected call option.The macro {{date_to_start}} is automatically replaced by the time and date of the scheduled call-back. |
| Cancel Call-Back | Edit the text that appears on the button that cancels the call-back process. |
Unavailable Pages
Edit the text that appears after a call option that is unavailable (at capacity or currently outside of working hours) is selected.
| Field | Description |
|---|---|
| After-Hours Text | Edit the text that appears when a call option is outside of its operating hours. |
| At-Capacity Text | Edit the text that appears when a call option has all of its scheduling slots full, with no more available during working hours. |
Error Messages
Edit the text that appears after an error occurs.
| Field | Description |
|---|---|
Error Dialog Title| Edit the title of the dialog that opens when an error occurs. This dialog title appears for every error a caller might encounter. |
|
Error Dialog Close| Edit the text that appears on the button that closes the error dialog. |
|
Network Failure| Edit the text that appears when there is a network connection failure. |
|
Invalid Option| Edit the text that appears when an invalid call-back option is selected. |
|
Duplicate Call-Back| (Duplicate Check only) Edit the text that appears when the caller phone number already has a call-back in queue. |
|
Number Undialable| Edit the text that appears when the caller phone number is not dialable. |
|
Number Invalid| Edit the text that appears when the caller phone number is invalid. |
|
Input Missing| Edit the text that appears when one or more required fields are empty. |
|
Failed to Start| Edit the text that appears when Fonolo fails to start the call-back process. |
|
Session Timeout| Edit the text that appears when the session for the IVR has expired. |
|
Retrying Title| Edit the title of the dialog that opens when the call-back is being retried after an error. |
|
Retrying Message| Edit the text that appears in the dialog when the call-back is being retried after an error. |
|
CAPTCHA Failed| Edit the text that appears when the caller fails the CAPTCHA. |
|
Active Call Failure| Edit the text that appears when Fonolo cannot load the details of the active call-back. |
|
Trigger Button
The main body of the web call-back widget does not appear until the trigger button is selected.
| Field | Description |
|---|---|
| Trigger Title | Edit the text that appears on the trigger button that opens the widget. |
Scheduled Call-Backs
Scheduled Call-Backs (or Conversation Scheduling) is an optional feature that lets your callers schedule a call-back for a later time or date.
Scheduled call-backs are offered in time intervals chosen by you. For example, you can offer scheduled call-backs with a 30-minute interval, such as from 9:00 to 9:30 or from 9:30 to 10:00. Fonolo dials in to your queue at the start of the time, so that the caller can expect to receive a call-back within the time interval.
Callers will be offered call-back time options based on the Offer Interval, Max Scheduled, and Daily Overflow settings.
Configure Scheduled Call-Backs
Selecting Enable scheduled call-backs on this profile lets you change the other features in this section.
| Field | Description |
|---|---|
| Enable scheduled call-backs on this profile | Select to turn scheduled call-backs on for the call-back profile. |
| Offer Interval | Choose the time intervals scheduled call-backs will be offered in. We recommend that you do not choose an interval shorter than your average hold time in case a scheduled call-back is delayed past the caller’s chosen time. |
| Max Scheduled | Choose the maximum number of scheduled call-backs that you will accept for each time slot. When a time slot reaches the max scheduled limit, it will no longer be offered to callers. |
| Max Options | Choose the number of scheduling options callers will be given when requesting a scheduled call-back. (Voice call-backs) The default value is 5 options, with a minimum value of 1 option and a maximum of 9 options. (Web call-backs and programmable call-backs) The default value is 5 options, with a minimum value of 1 option and a maximum of 100 options. |
| Daily Overflow | Choose how far into the future a caller may schedule a call-back. |
| Force Scheduling | Select to force callers to schedule a call-back for the future. Callers can not choose to receive a call-back from the next available agent. |
| Client Timezone | (Web call-backs only) Select to show call-back time options that are adjusted based on the caller’s time zone. |
| Confirmation | (Voice call-backs only) Select to play the caller their scheduled call-back time slot to confirm it with them. |
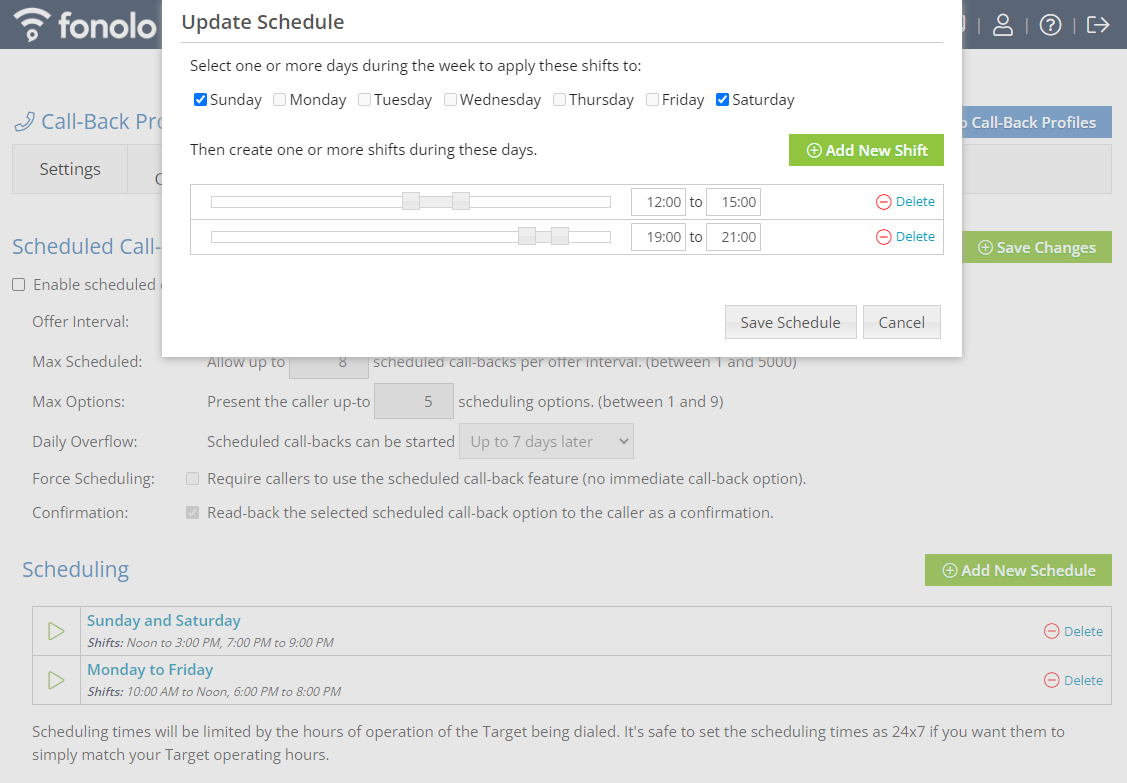
Scheduling
Scheduling lets you set time windows on different days that will let callers schedule call-backs. You can, for example, set a schedule for the hours when your queue is closed so that callers who call in off-hours are still able to schedule a call-back for the next day.
Add a New Schedule
Schedules are broken down into shifts. When a shift is active, scheduled call-backs will be offered to callers. A schedule can have as many shifts within it as you want.
In the call-back profile Scheduled Call-Backs section:
- Select Add a New Schedule.
- Choose which days of the week the schedule will apply to by selecting each day’s checkbox.
- Move the sliders or enter in a time range so that the time between each limit represents the time that call-backs will be offered within.
- (Optional) Select Add New Shift to create a new slider and choose a time range that call backs will be offered within.
- Select Save Schedule.
Pre-Call Questions
Pre-call questions let you ask the caller for certain information once the call is transferred to Fonolo. This information is then passed along to the agent before they start the call-back, arming them with key information that helps the call go smoothly.
To add a pre-call question, select Add New Question in the Pre-Call Questions tab of the call-back profile.
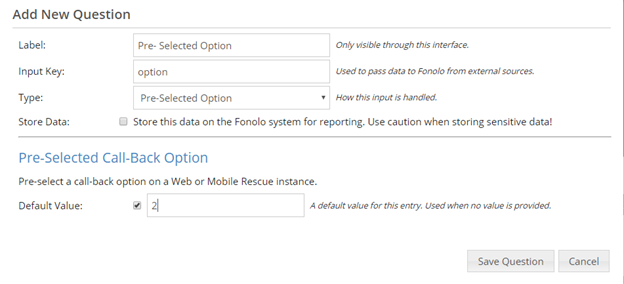
Add New Question Dialog
The Add New Question dialog opens after you select Add New Question.
| Field | Description |
|---|---|
| Label | Enter the name of the new question. |
| Input Key | Defines a variable for the pre-call question that is passed to Fonolo. The input key is automatically generated for you based on the pre-call question label. After entering the Label, selecting the Input Key field will automatically insert a valid input key. |
| Type | Choose the input method callers will use to answer the question. Generally, two main question types are used: DTMF input to have callers enter a number, or a recorded message to have the caller record some audio. |
| Store Data | Select to have the caller’s input data stored on Fonolo servers. Keep in mind that if the data contains sensitive information, you may not be allowed to host it outside of your own servers. |
Input Type Options
This table explains the options that can be selected in the Input Type drop-down menu of the Add New Question dialog.
| Option | Description |
|---|---|
| Numeric Input (DTMF) | Have the caller enter a number to answer the question. |
| Recorded Message | (Voice call-backs only) Have the caller record an audio message to be played to the agent. |
| SIP Header | (Voice call-backs and web call-backs only) If you collect information about callers before they are transferred to Fonolo, it can be passed to your agent through us by using a SIP header. |
| Text Input | (Web call-backs and programmable call-backs only) Have the caller enter a message with text to answer the question. |
| Client Call-Back Country Code | (Voice call-backs and programmable call-backs only) The country code of the initial number the caller used to call into your queue. No caller input is required. |
| Pre-Selected Option | (Web call-backs only) Select to enable a default value. This value will appear as the pre-selected value in this field when the caller opens this page of the widget. They can still change the value, if they wish. |
| Client ANI Number | Send the agent the phone number the caller wants to receive their call-back on. No caller input is required. |
| Client ANI Name | Send the agent the caller ID of the phone number the caller wants to receive their call-back on. No caller input is required. |
| ICR ANI Number | Send the agent the initial number that the caller used to call into your queue. No caller input is required. |
| ICR ANI Name | Send the agent the initial caller ID of the number that the caller used to caller your queue. No caller input is required. |
Depending on the input type you have selected, different question options are available.
Numeric Input (DTMF)
Have the caller enter a number to answer the question.
| Field | Description |
|---|---|
| Audio Prompt Question | (Voice call-backs only) Select the audio file that will prompt the caller with a question to answer. Go to How to Upload Audio Prompts for more information on customizing the Fonolo audio. |
| Length (min/max) | Select the minimum and maximum number of digits the caller can enter to answer the question. |
| Flags | (Web call-backs only) Select one or more flags to apply to the question. Required: The caller cannot continue until they have provided a valid answer to the question. Visible: Choose whether to make the field visible to the caller. Editable: Choose whether to make the field editable by the caller. This flag can be used in conjunction with the Default Value field to send certain information to the agent - for example, an account number if the customer is already logged in. |
| Required | (Voice call-backs and programmable call-backs only) Select to make sure that the caller cannot continue until they have provided a valid answer to the question. |
| Confirmation Menu | (Voice call-backs only) Select to have the caller’s answer read back to them using text-to-speech. The caller must then press DTMF 1 to confirm their answer is correct. |
| Agent Whisper | Select to have the question and answer read out during the whisper to the agent using text-to-speech. |
| Default Value | Enter a value that will be used if the caller does not answer the question. |
| SIP Header Name | Select to have the caller’s answer included in the SIP header that is passed to the agent. Enter a name for the SIP header to identify the information to the agent. |
(Voice Call-Backs only) Recorded Message
Have the caller record an audio message to be played to the agent.
| Field | Description |
|---|---|
| Audio Prompt Question | Select the audio file that will prompt the caller with a question to answer. Go to How to Upload Audio Prompts for more information on customizing the Fonolo audio. |
| Length (max) | (seconds) Select the maximum length the caller’s answer can be. The default value is 10 seconds, with a minimum value of 1 second and a maximum of 30 seconds. |
| Required | Select to make sure that the caller cannot continue until they have provided a valid answer to the question. |
| Confirmation Menu | Select to have the caller’s audio played back to them. The caller must then press DTMF 1 to confirm their answer is correct. |
| Agent Whisper | Select to have the question and answer read out during the whisper to the agent. |
(Web Call-Backs and Programmable Call-Backs Only) Text Input
Have callers enter text using a keyboard to answer the pre-call questions.
| Field | Description |
|---|---|
| Length (min/max) | (characters) Select the minimum and maximum length the caller’s answer can be. The default values are 0 characters minimum and 10 maximum, with a minimum value of 0 characters and a maximum of 100. |
| Flags | (Web call-backs only) Select one or more flags to apply to the question. Required: The caller cannot continue until they have provided a valid answer to the question. Visible: Choose whether to make the text input field visible to the caller. Editable: Choose whether to make the text input field editable by the caller. This flag can be used in conjunction with the Default Value field to send certain information to the agent - for example, an account number if the customer is already logged in. |
| Agent Whisper | Select to have the question and answer read out during the whisper to the agent using text-to-speech. |
| Select the text-to-speech voice to be used. | |
| Default Value | Select to enable a default value. This value will appear as the pre-selected value in this field when the caller opens this page of the widget. |
| SIP Header Name | Select to have the caller’s answer included in the SIP header that is passed to the agent. Enter a name for the SIP header to identify the information to the agent. |
(Web Call-Backs and Programmable Call-Backs Only) Client Call-Back Country Code
Send the country code of the initial number the caller used to call into your queue to the agent. No caller input is required.
| Field | Description |
|---|---|
| Default Value | Select to enable a default value. This value will appear as the pre-selected value in this field when the caller opens this page of the widget. |
(Web Call-Backs Only) Pre-Selected Options
Choosing a pre-selected option default Call-Back Option value can be passed to the widget, which automatically forces the widget to open on the selected call-back option.
| Field | Description |
|---|---|
| Default Value | Select to enable a default value. This value will appear as the pre-selected value in this field when the caller opens this page of the widget. |
Pre-Selected Options can be defined in one of two places. The value can be typed into the pre-call question field, or, alternatively, the value can be passed via the JavaScript code that is added to the head of the webpage, allowing the widget to load on the site.
The Pre-Selected Option pre-call question must be created in the Fonolo Portal and a default value must not be set if values will be passed from the JavaScript code of the widget. Go to Front-End Responsive Web Rescue Customization Using JavaScript for more information.